Tutorial
1
Choose Your Matching Mode
The matching mode determines what children are connecting and what skill they are practicing. This is the most important decision for your product because it defines the learning objective and the buyer audience.
The Matching Worksheet Maker offers four distinct modes:
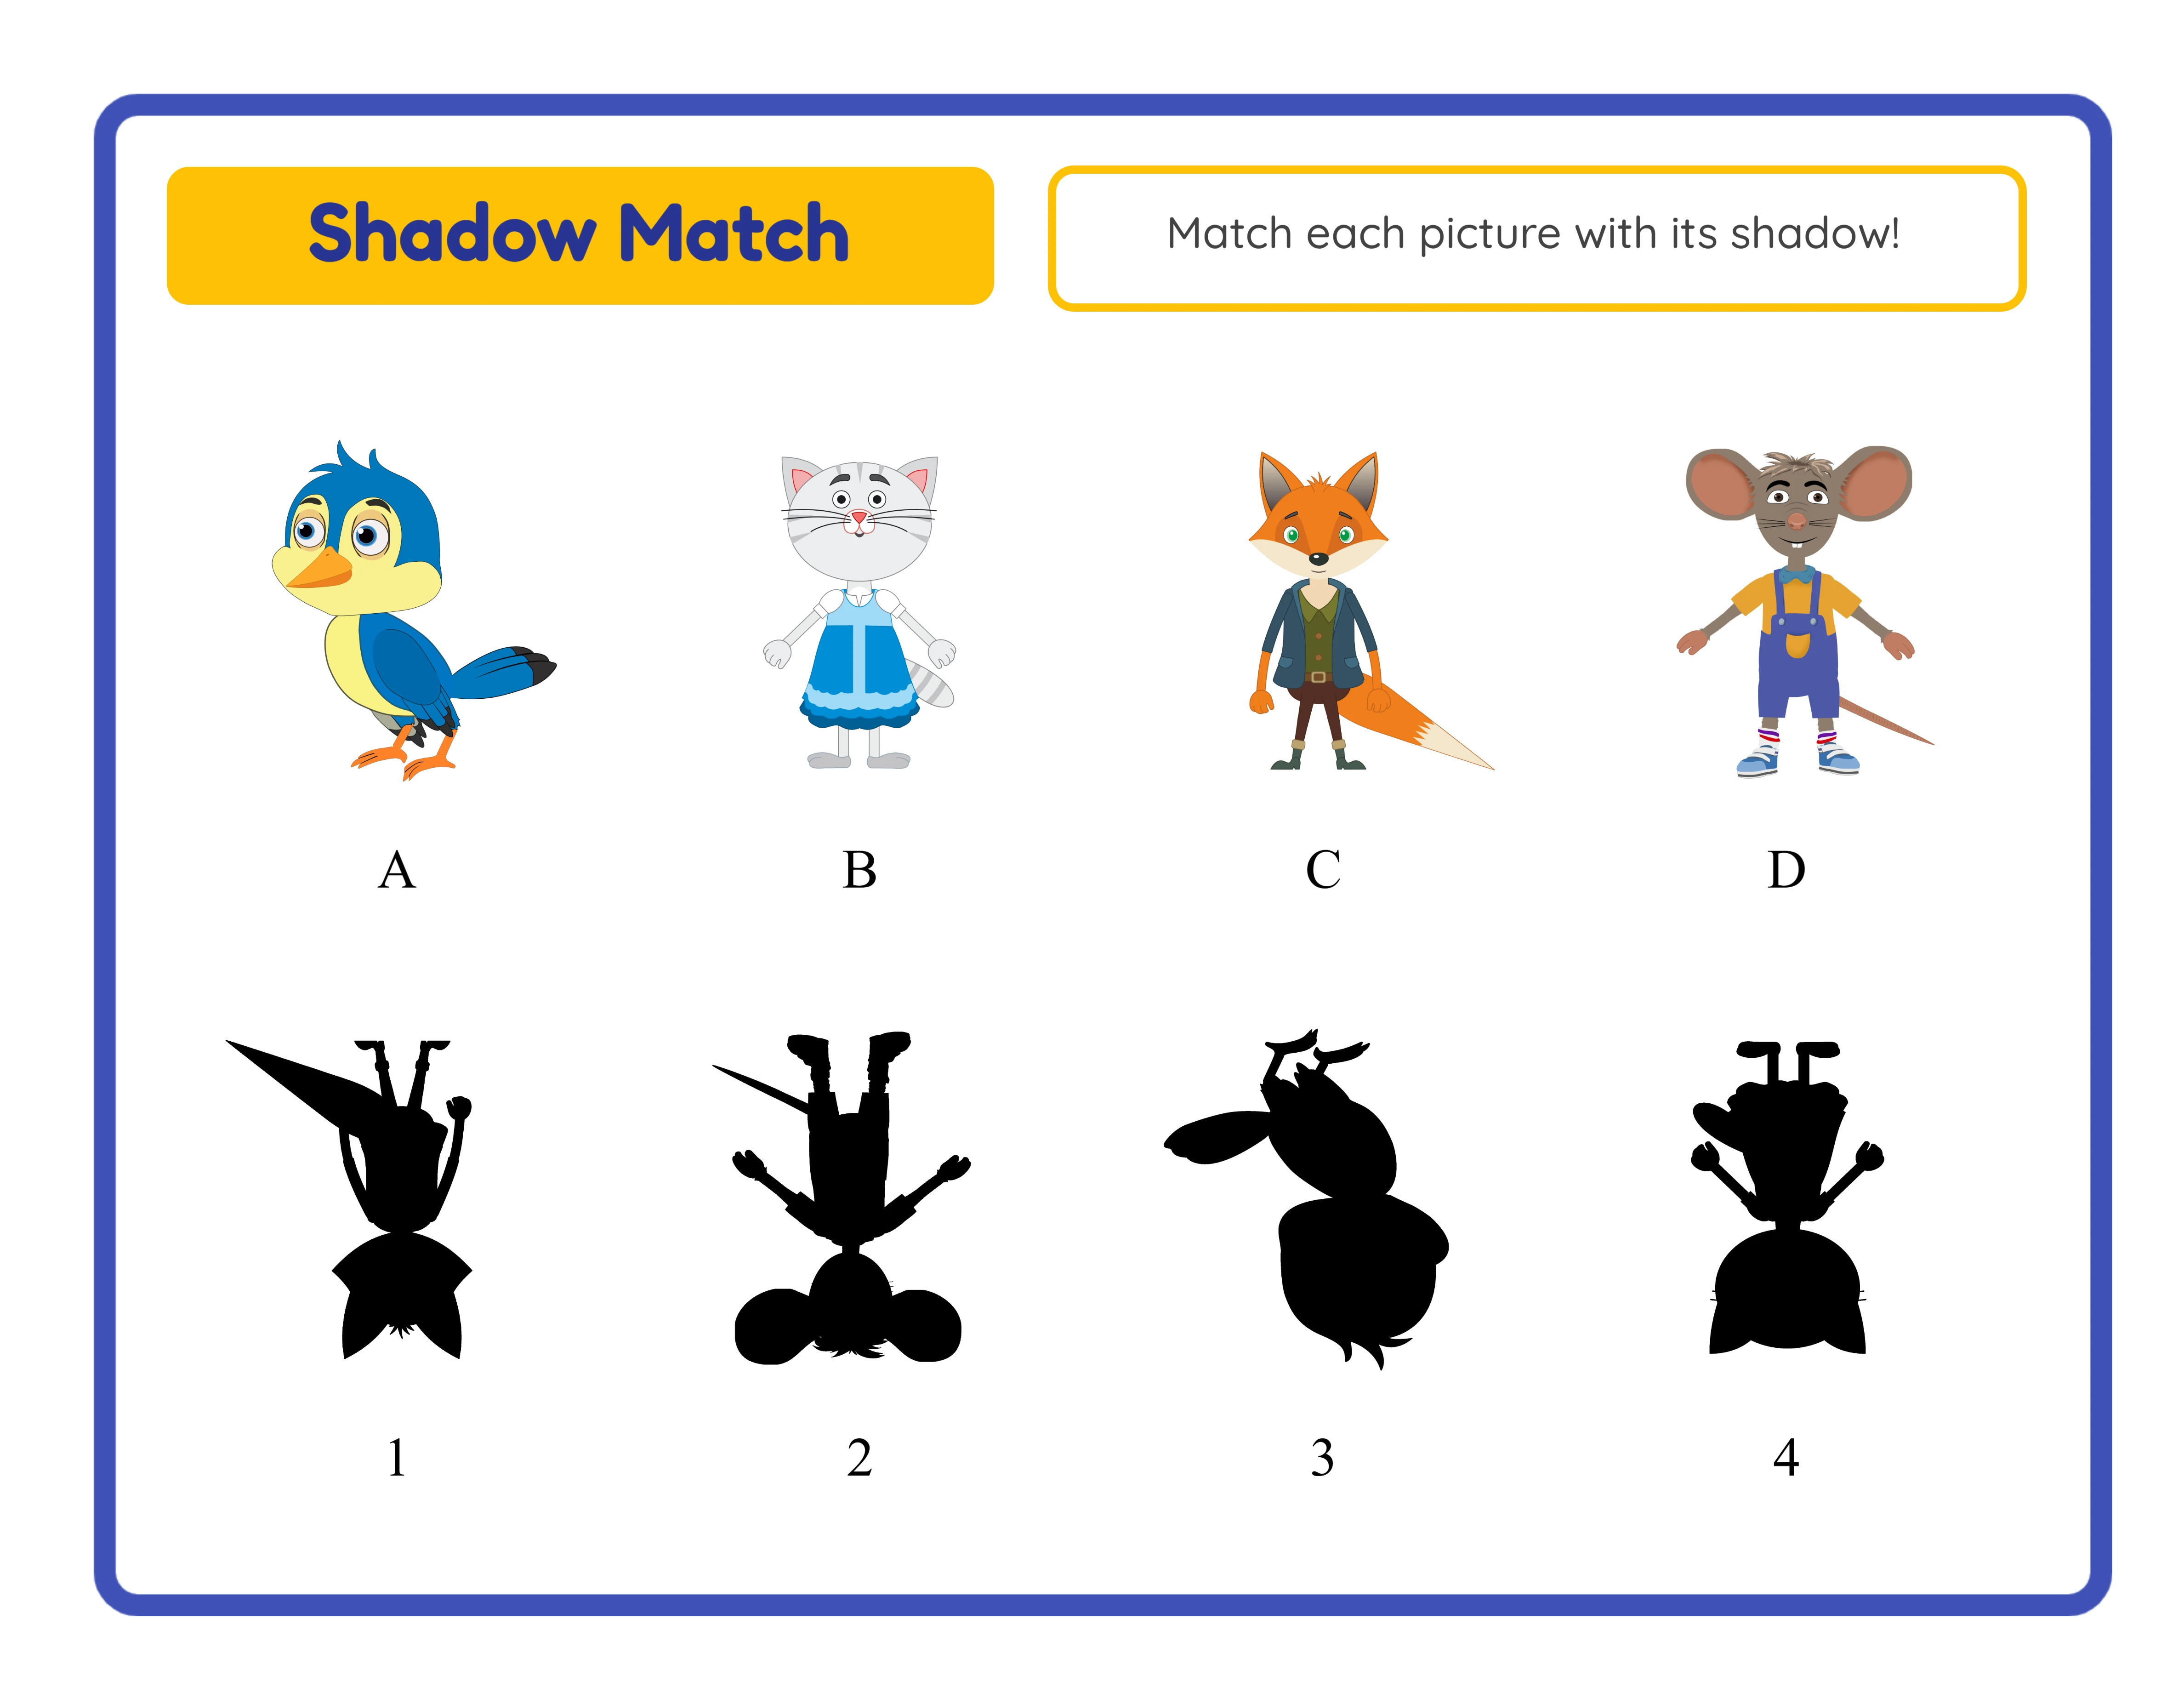
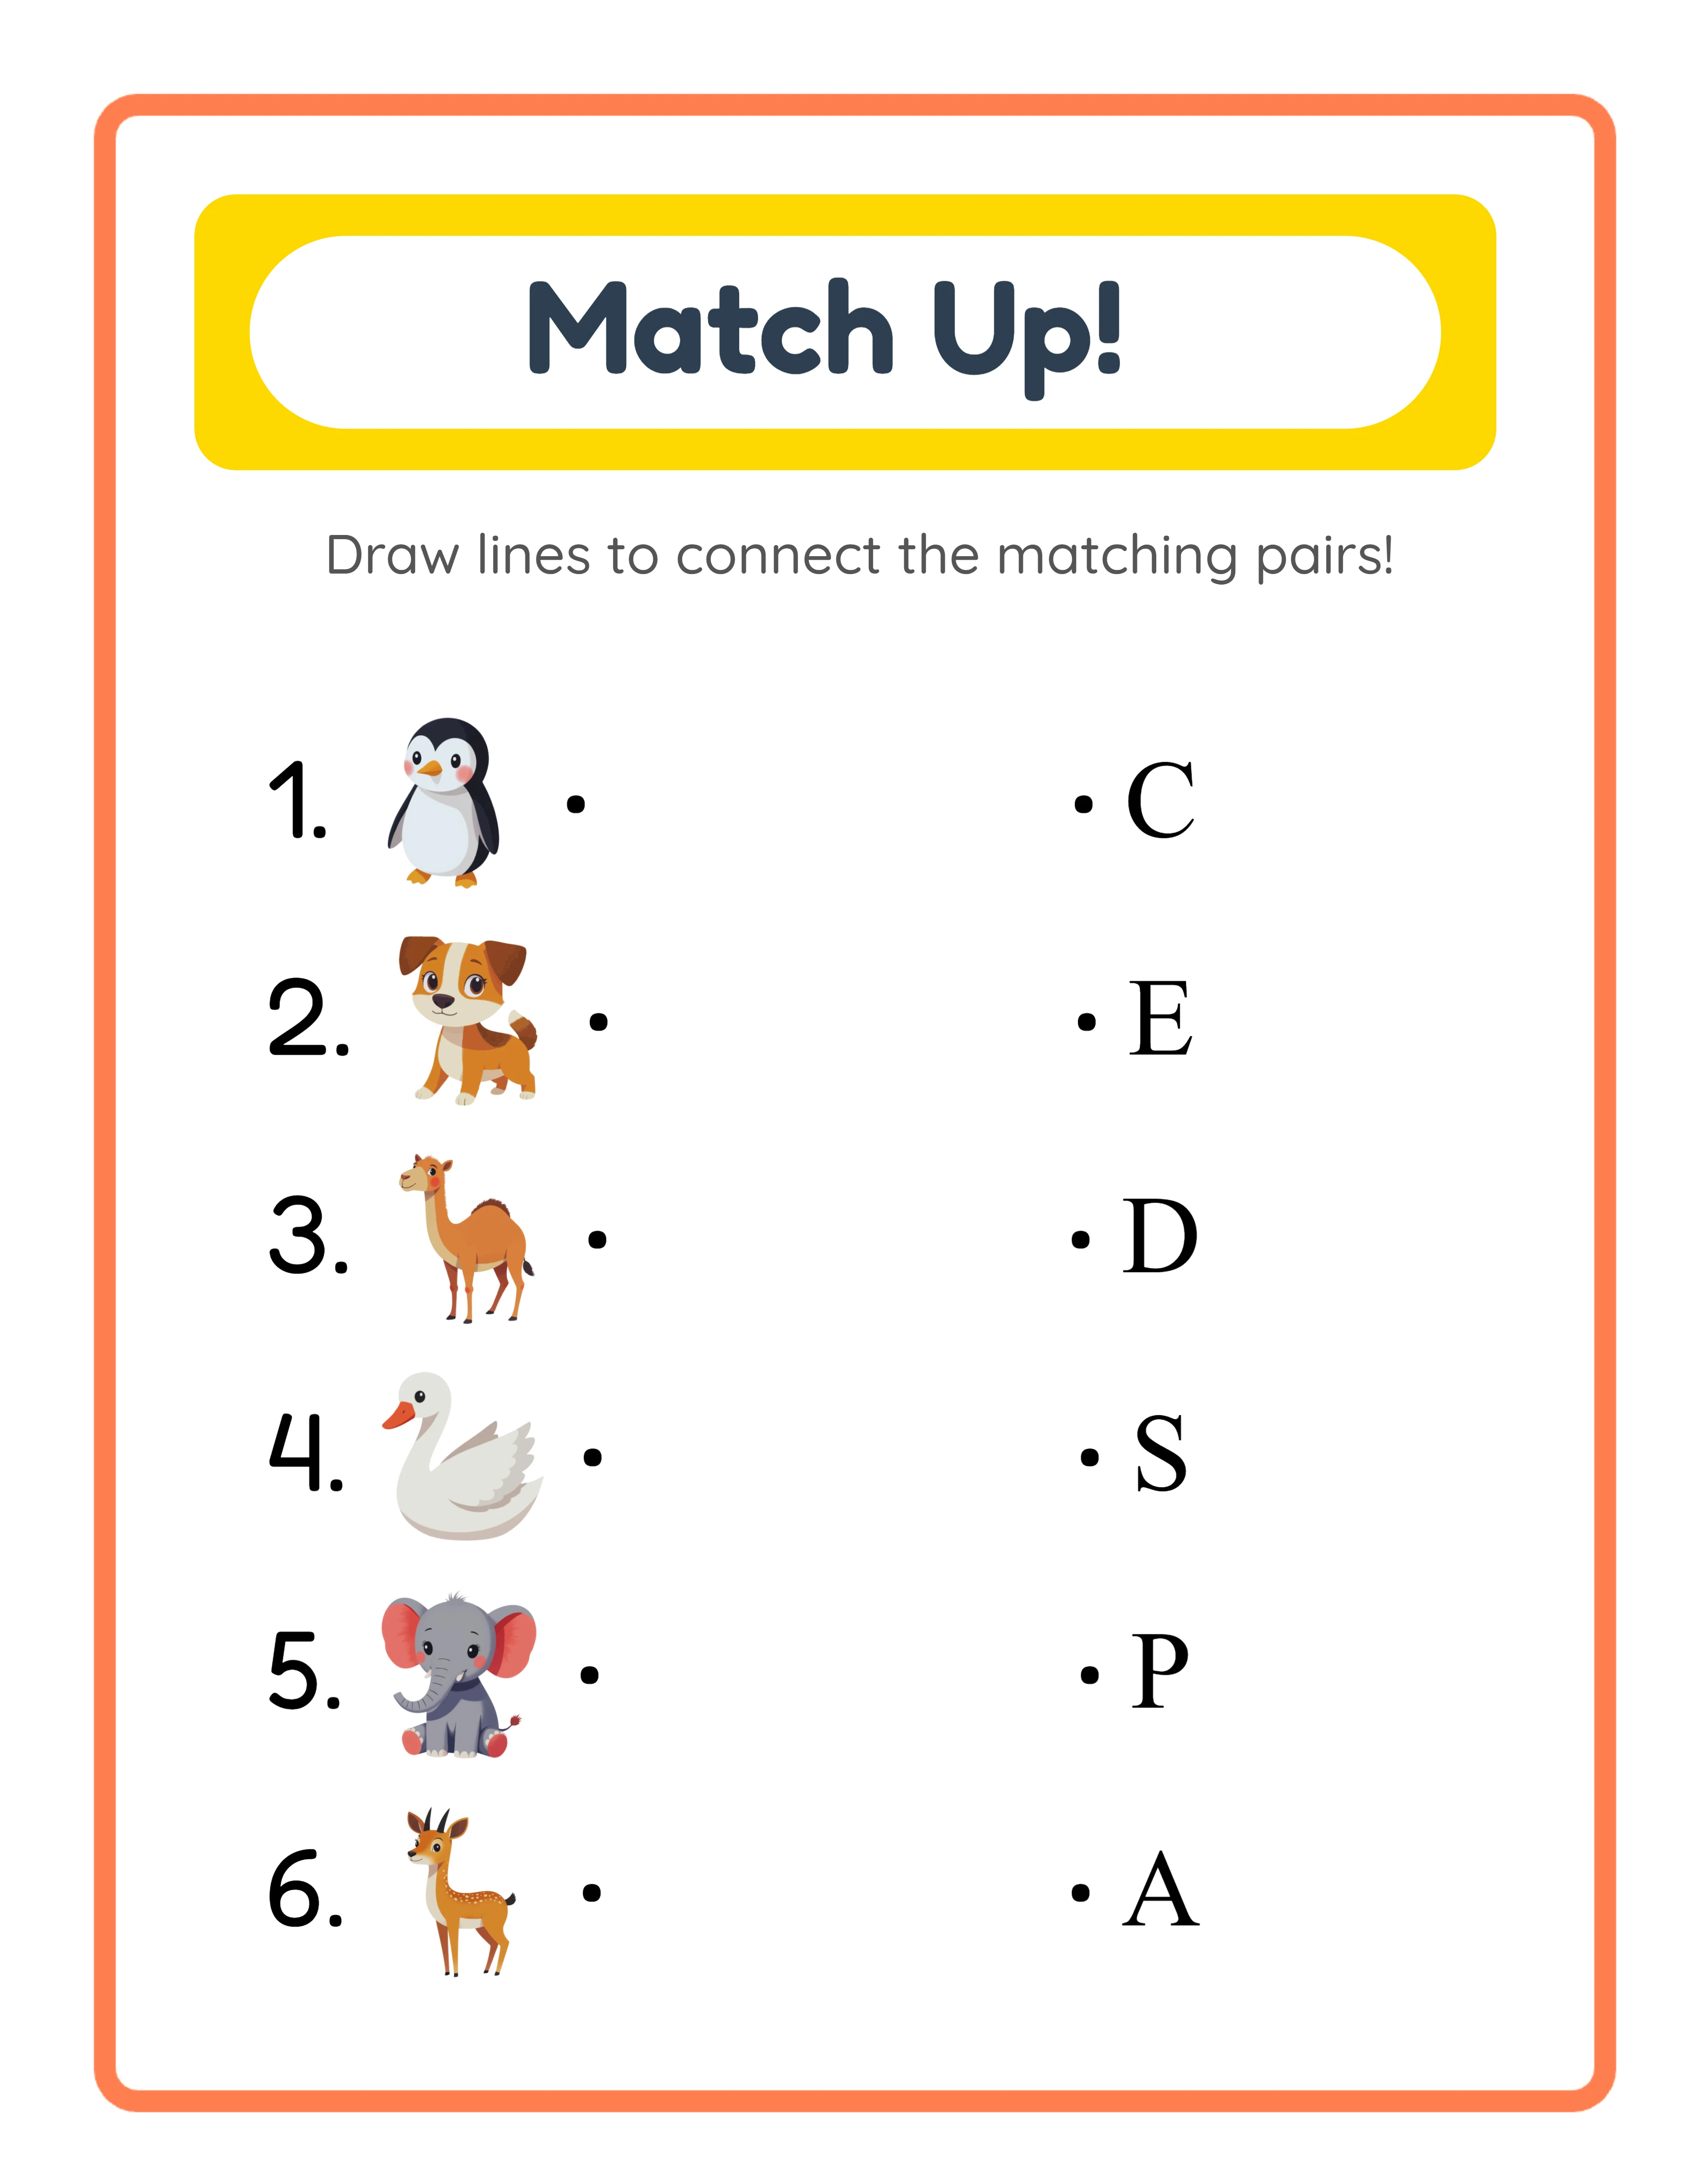
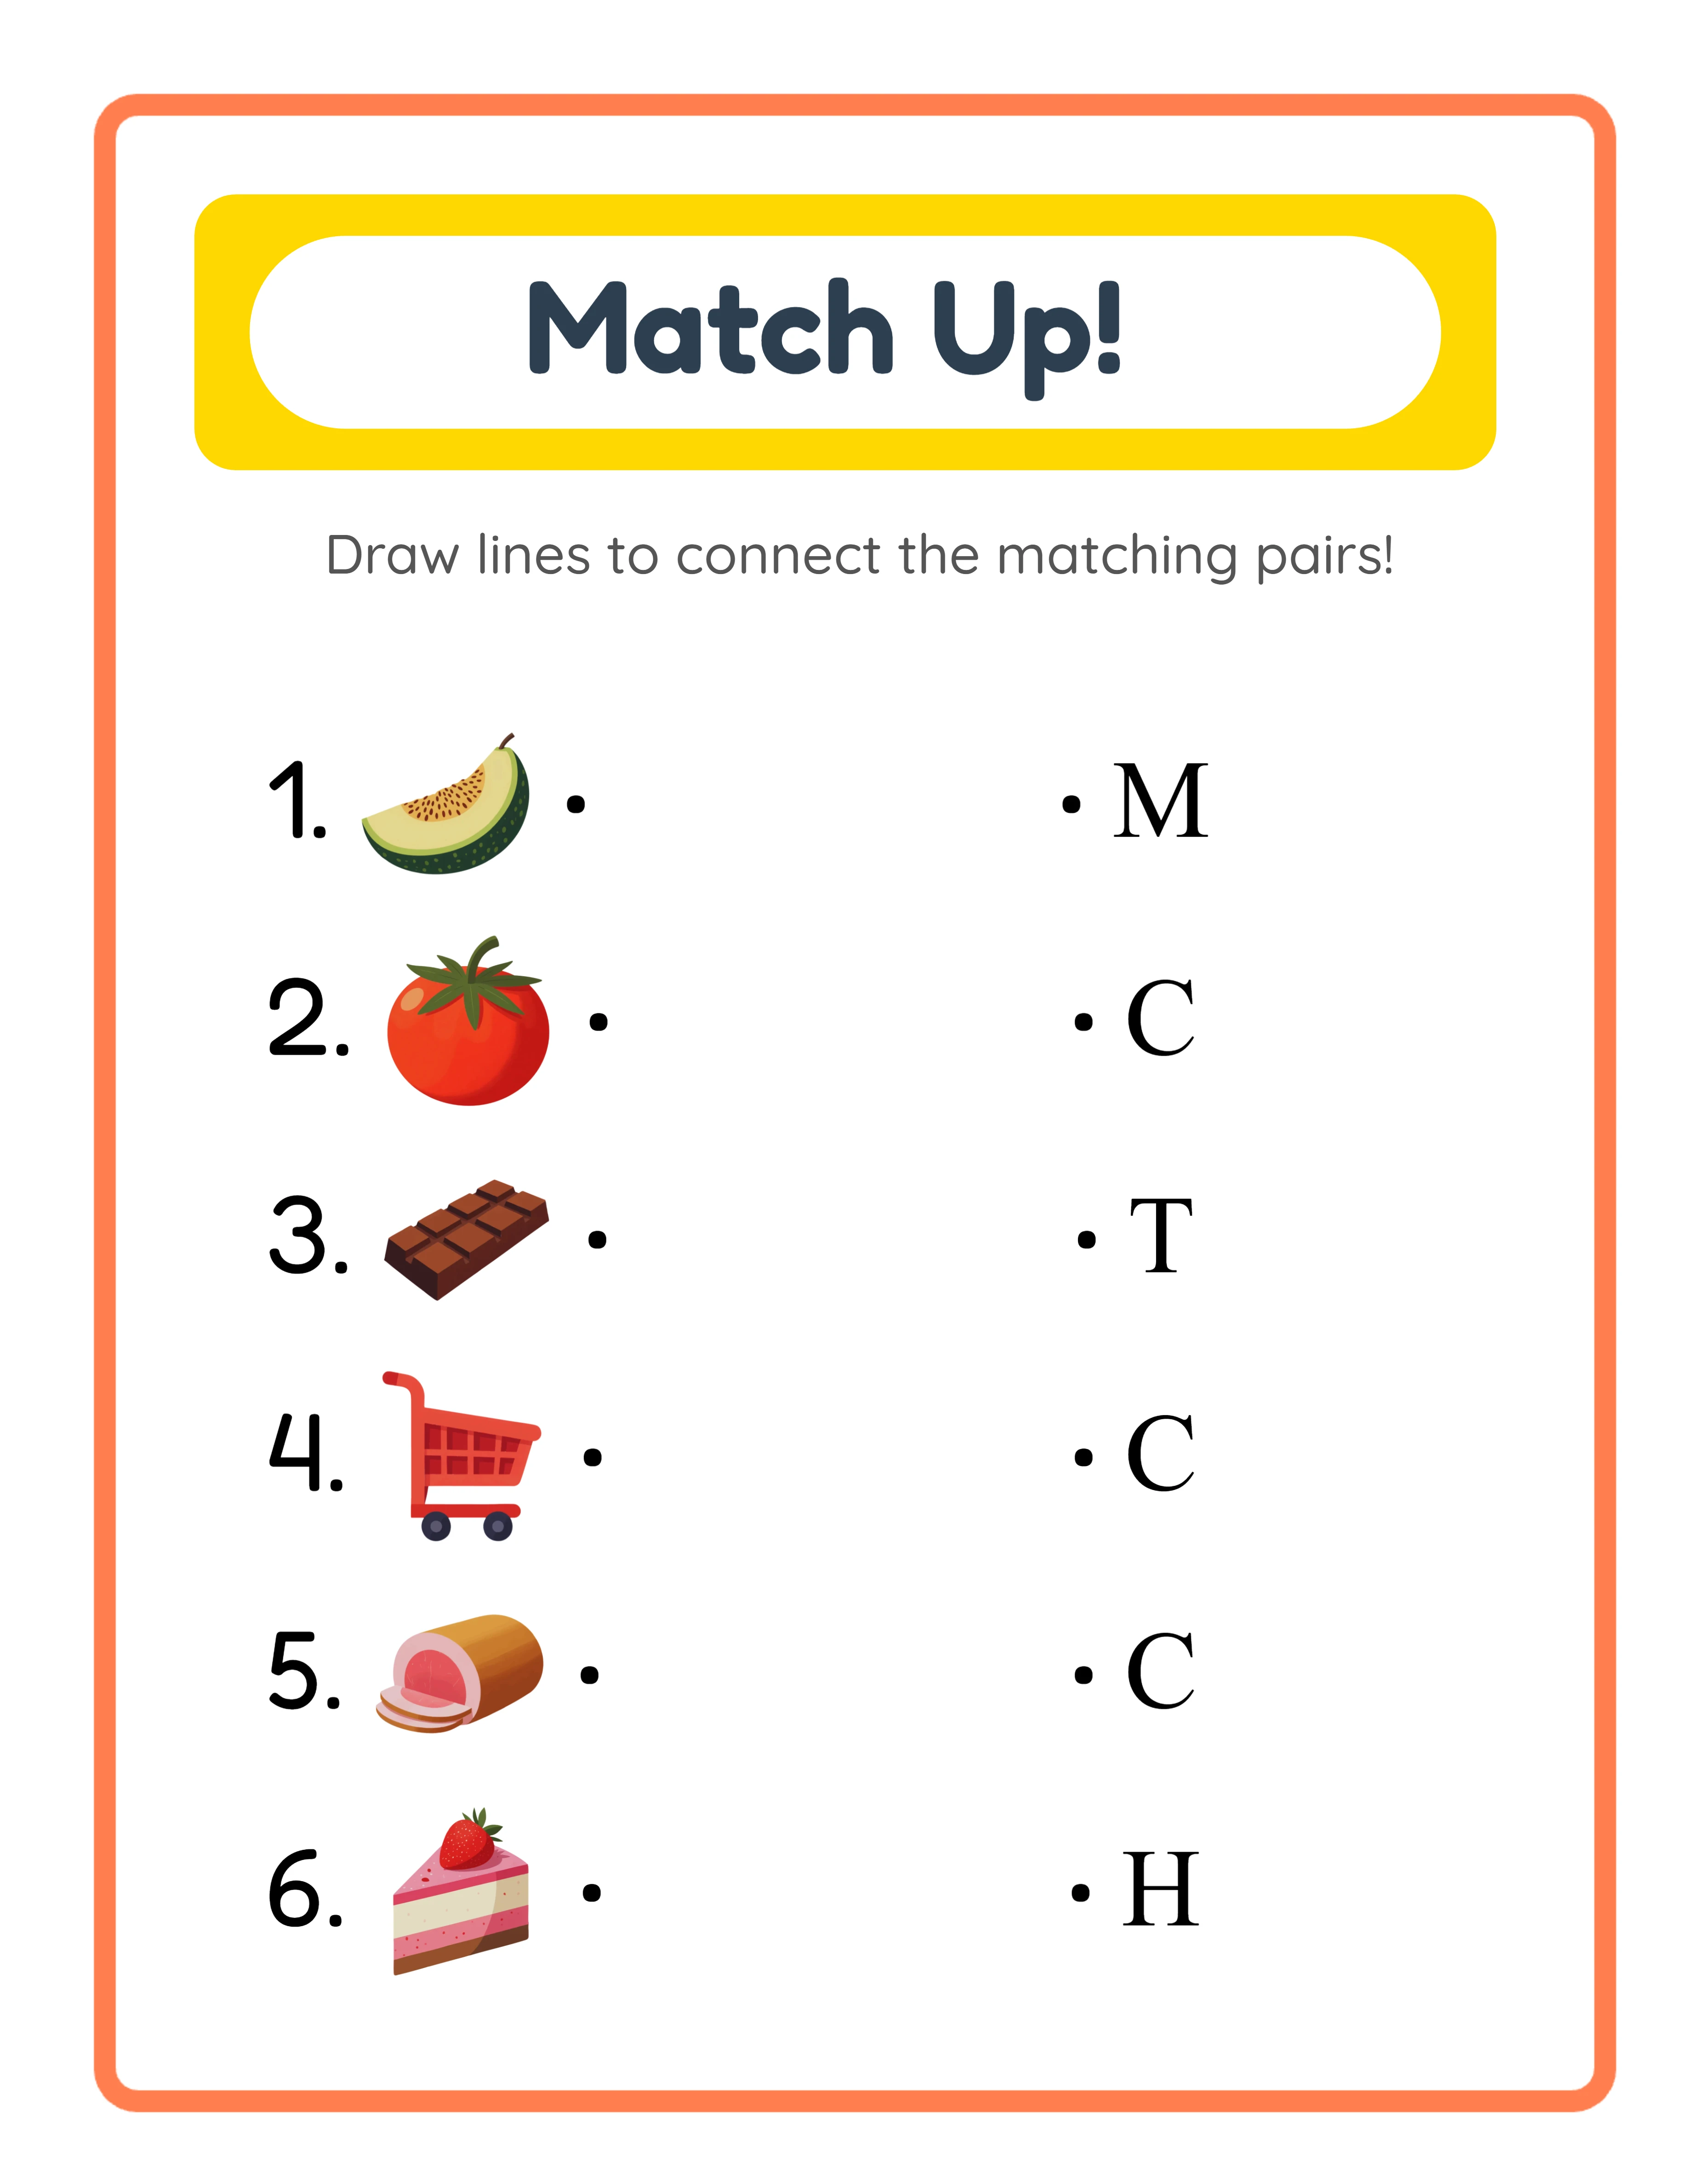
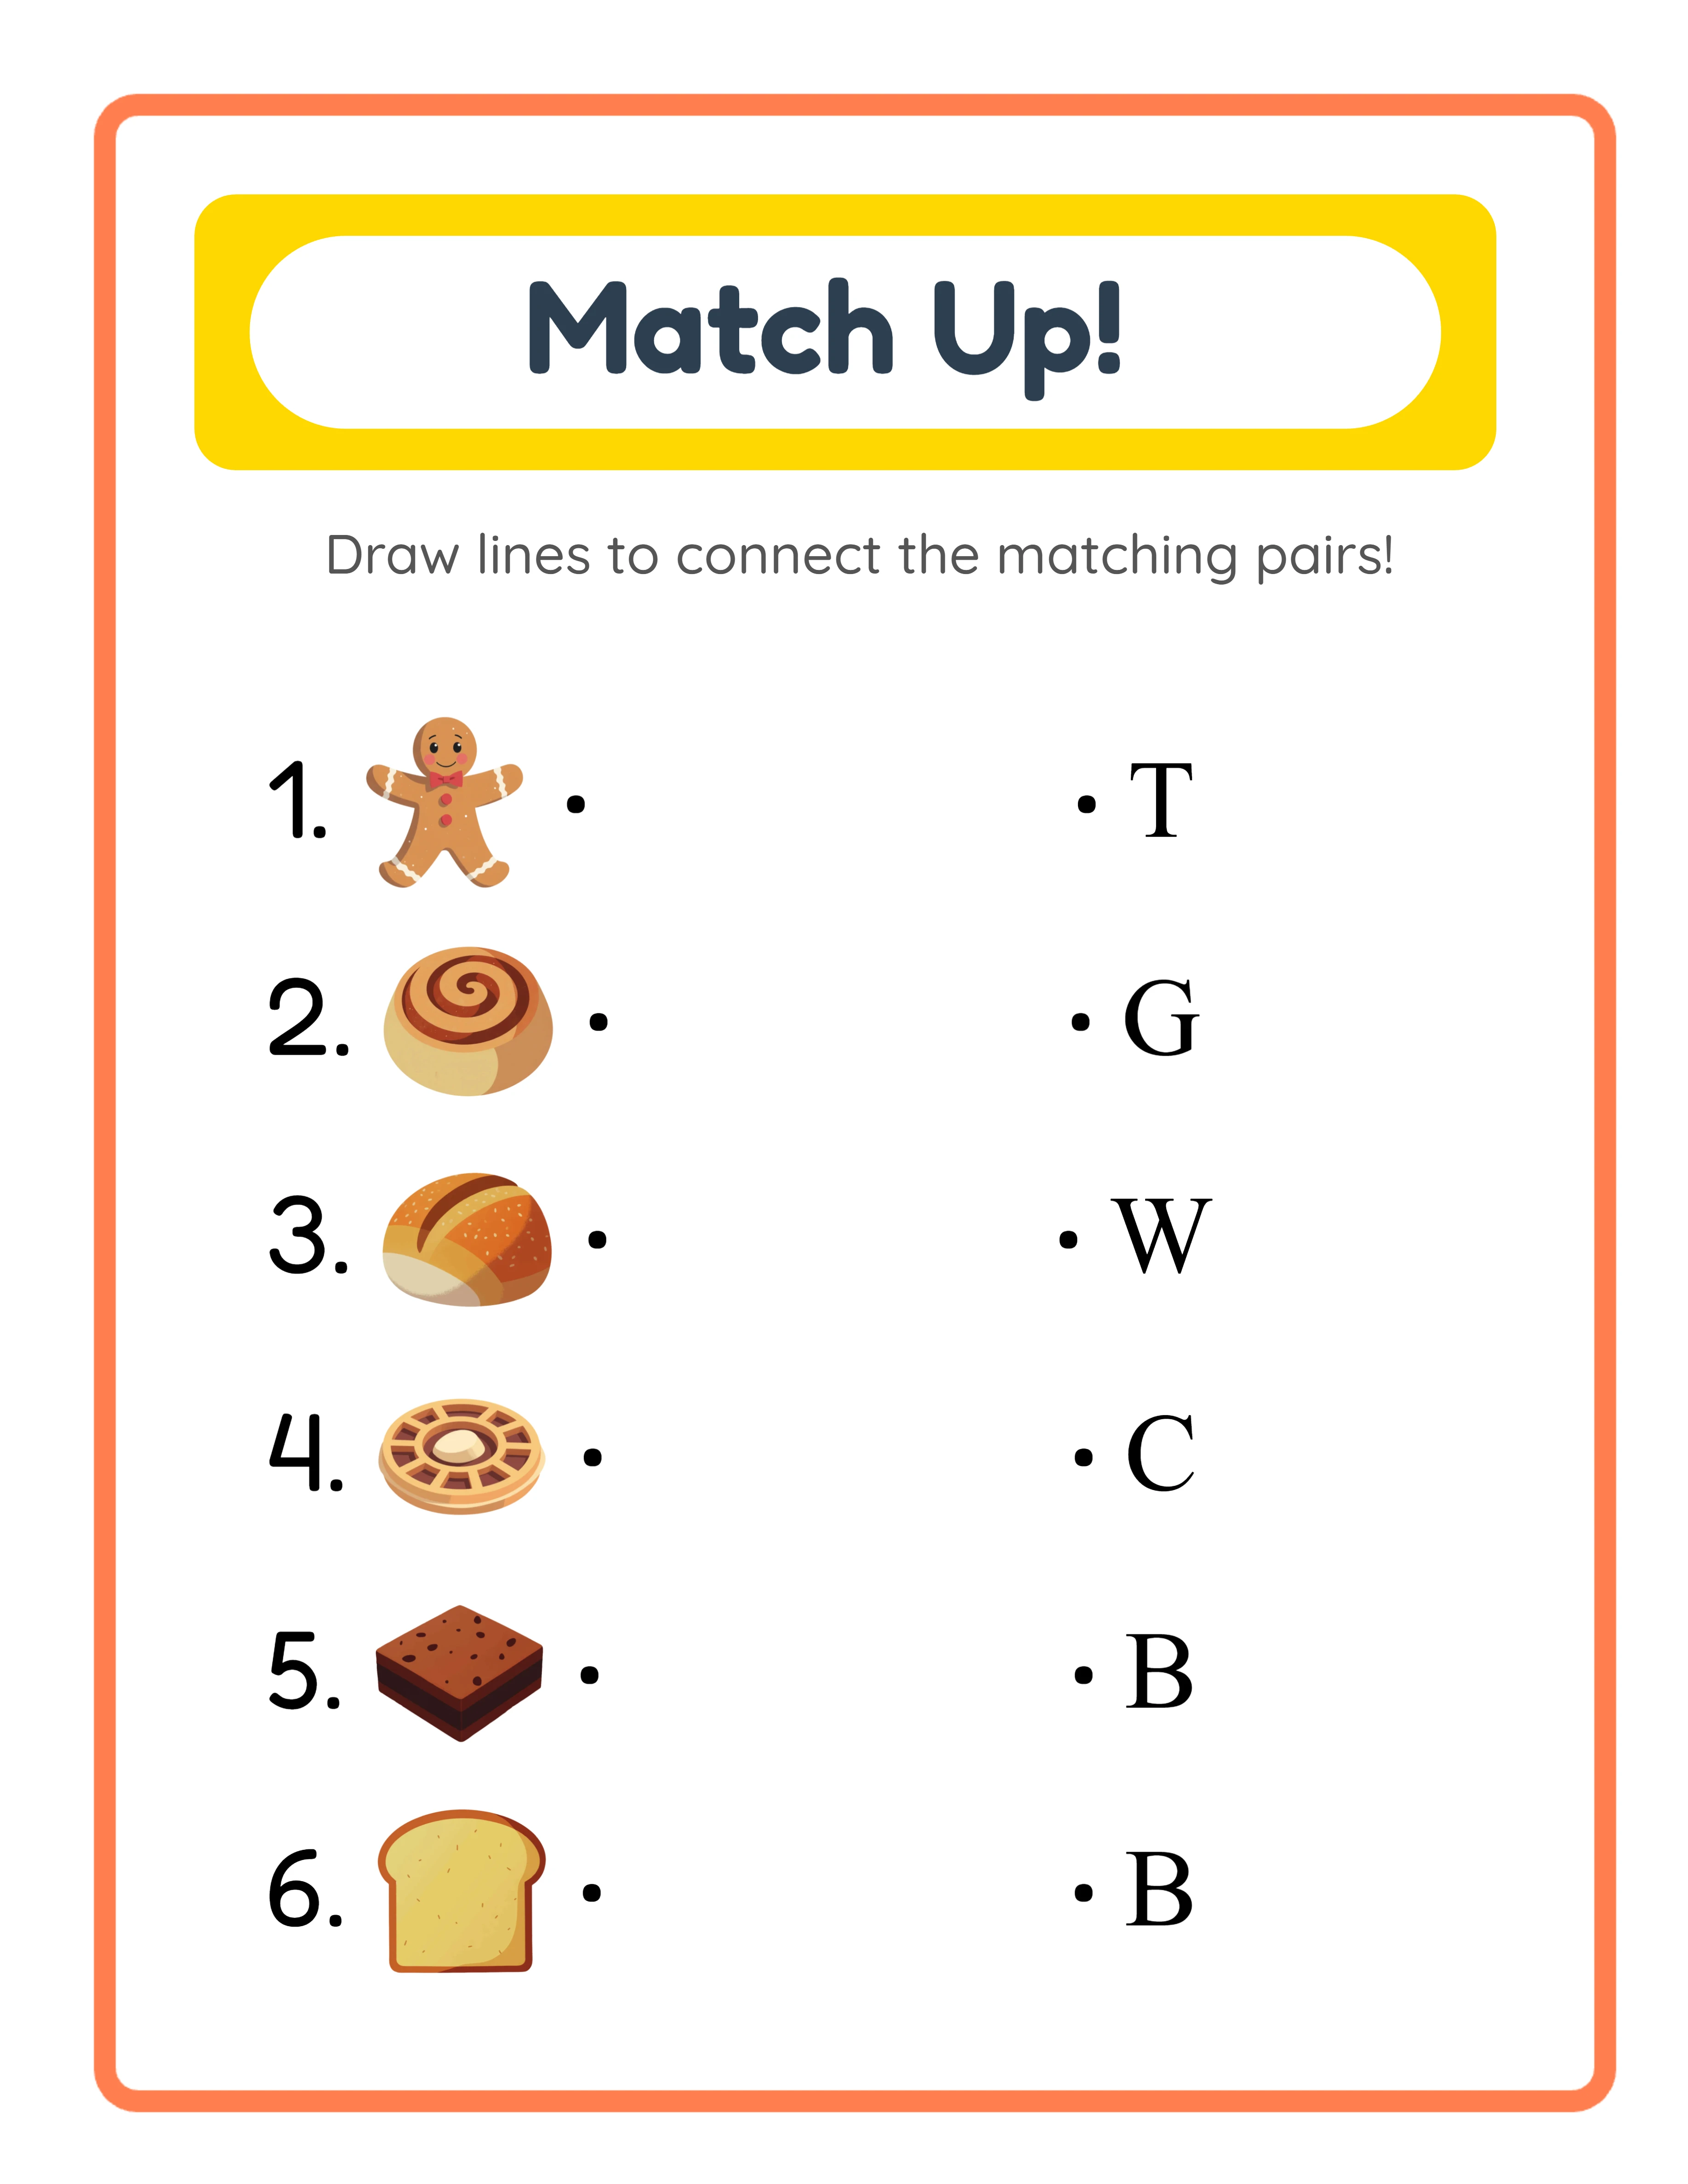
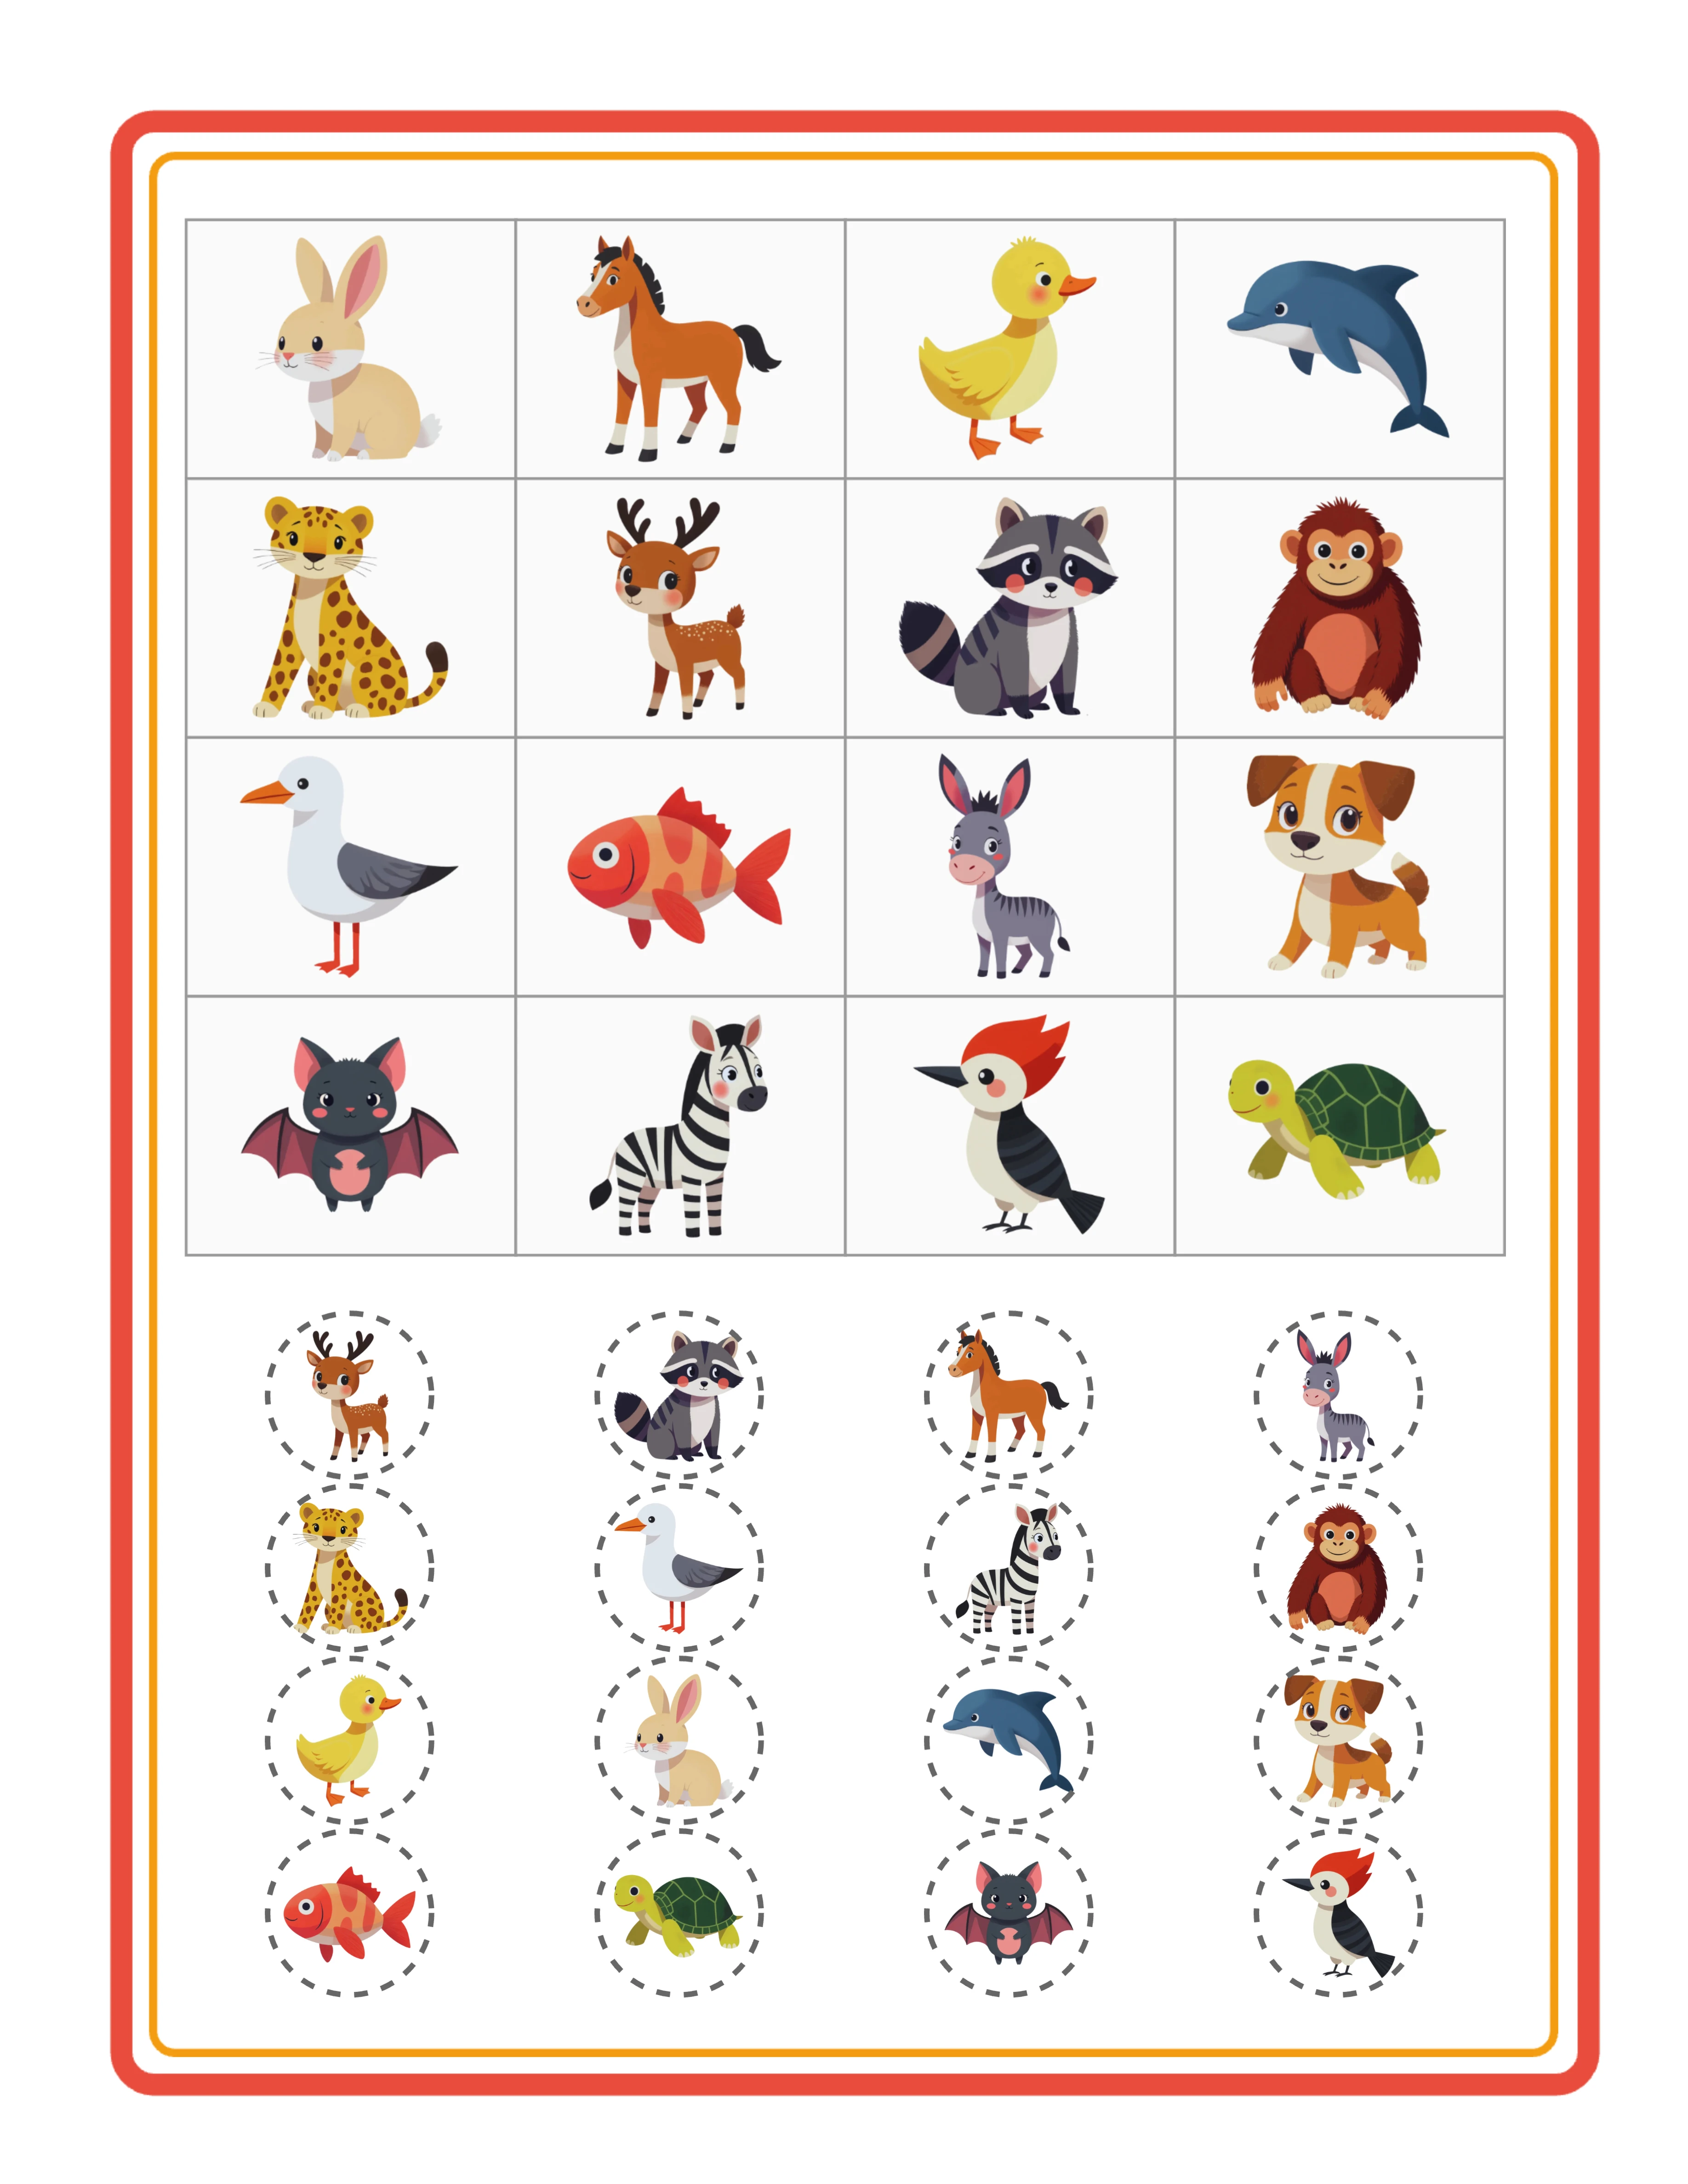
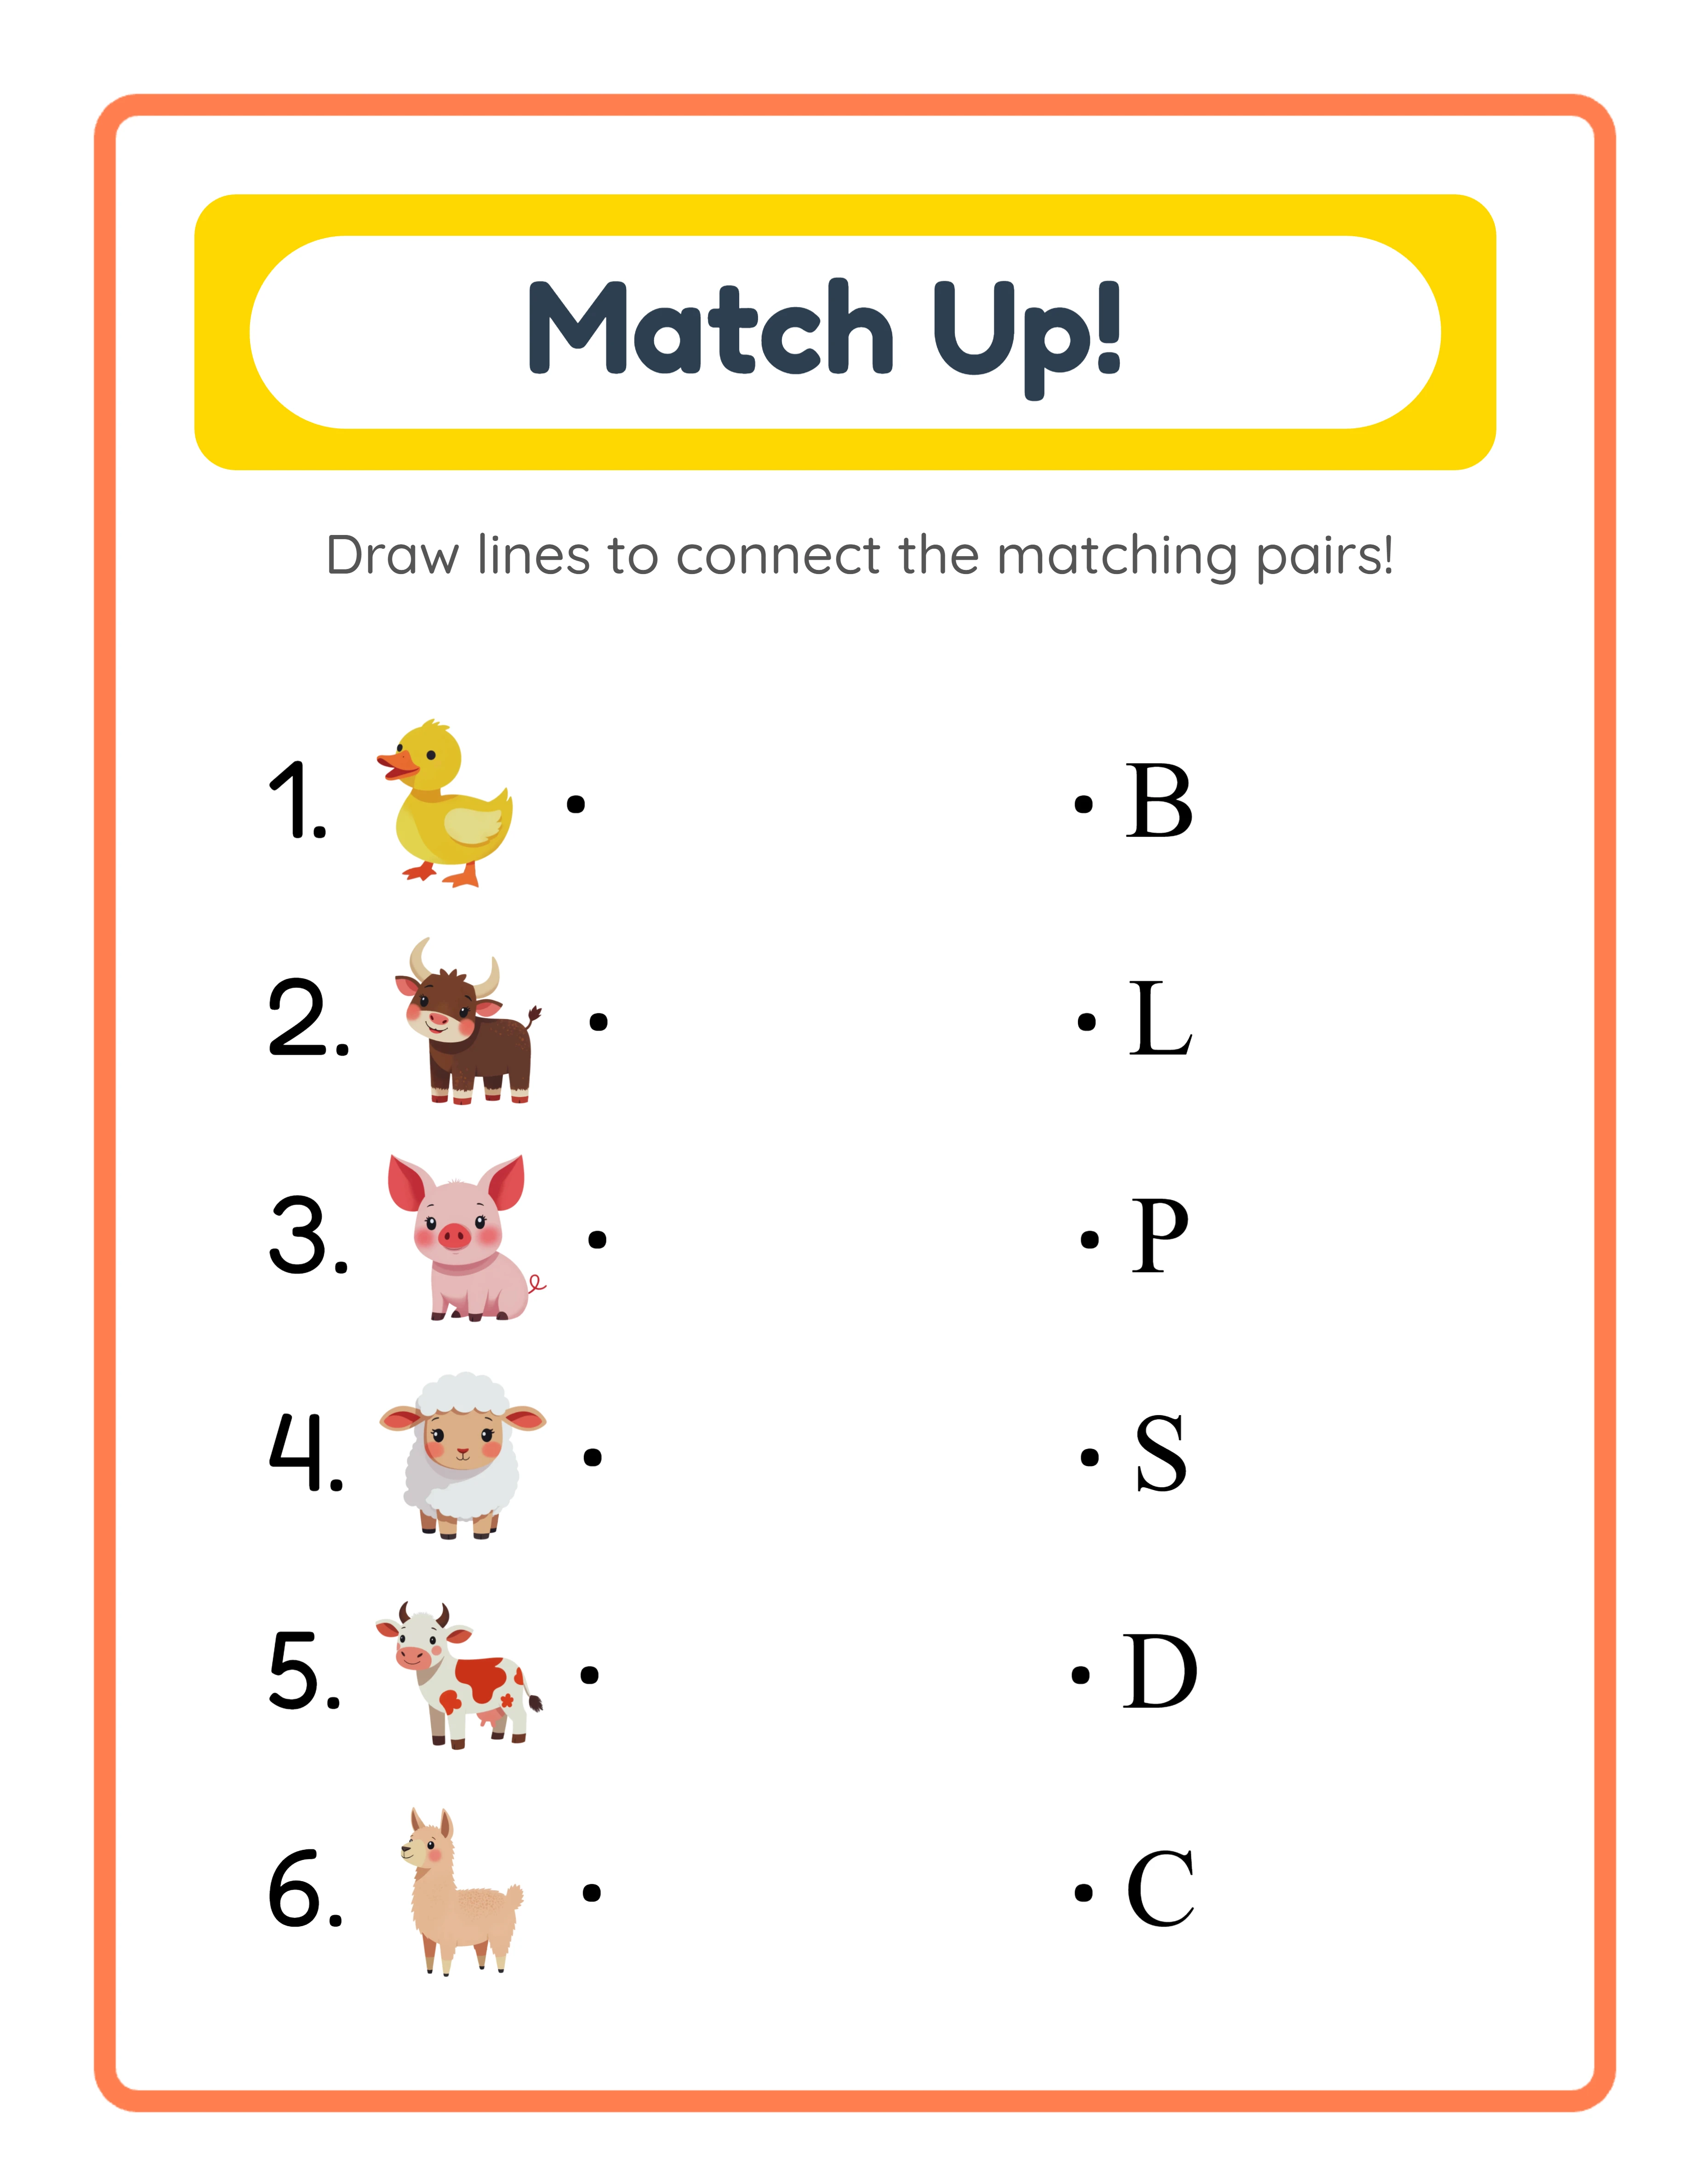
Letter mode (Beginning Letter): Each row shows a themed image on one side and a letter on the other. Children match images to their beginning letter. A picture of a cat matches the letter C. A picture of a dog matches D. This mode teaches letter recognition and phonics — core preschool and kindergarten skills. The generator automatically determines the correct beginning letter based on the selected language, so switching to German produces German beginning letters.
Image+Name mode: Each row shows a themed image paired with its written name. Children match images to their correct word labels. This mode builds vocabulary and word recognition. The word labels are localized — selecting French produces French vocabulary words automatically.
Image-or-Name mode: This is the most flexible mode. Each row can independently show an image, a word, or both on either side. You configure each row individually using the per-row settings panel. This lets you create worksheets with mixed difficulty — some rows show image-to-image, others show image-to-word, and others show word-to-word. Ideal for assessment worksheets that test multiple skills on a single page.
Custom mode: You type your own words for each pair. The generator shows a themed image on one side and your custom text on the other. This enables spelling worksheets, foreign language vocabulary practice, sight word activities, and any other text-based matching you can imagine. Each row has its own text field, giving you complete control over the content.
Select your mode from the Matching Mode dropdown in the configuration panel. For product creation, consider building separate products for each mode — a "Letter Matching" product and a "Vocabulary Matching" product target completely different search keywords and buyer needs.
2
Select a Theme from the Image Library
Themed matching worksheets consistently outsell generic ones because parents and buyers search for specific topics. "Animal matching worksheet for preschool" and "dinosaur letter matching" are real search queries that drive purchases.
The Matching Worksheet Maker includes an image library with over 3,100 illustrations organized across 104 themes. Use the theme dropdown to browse categories, or type in the search field to find specific themes instantly.
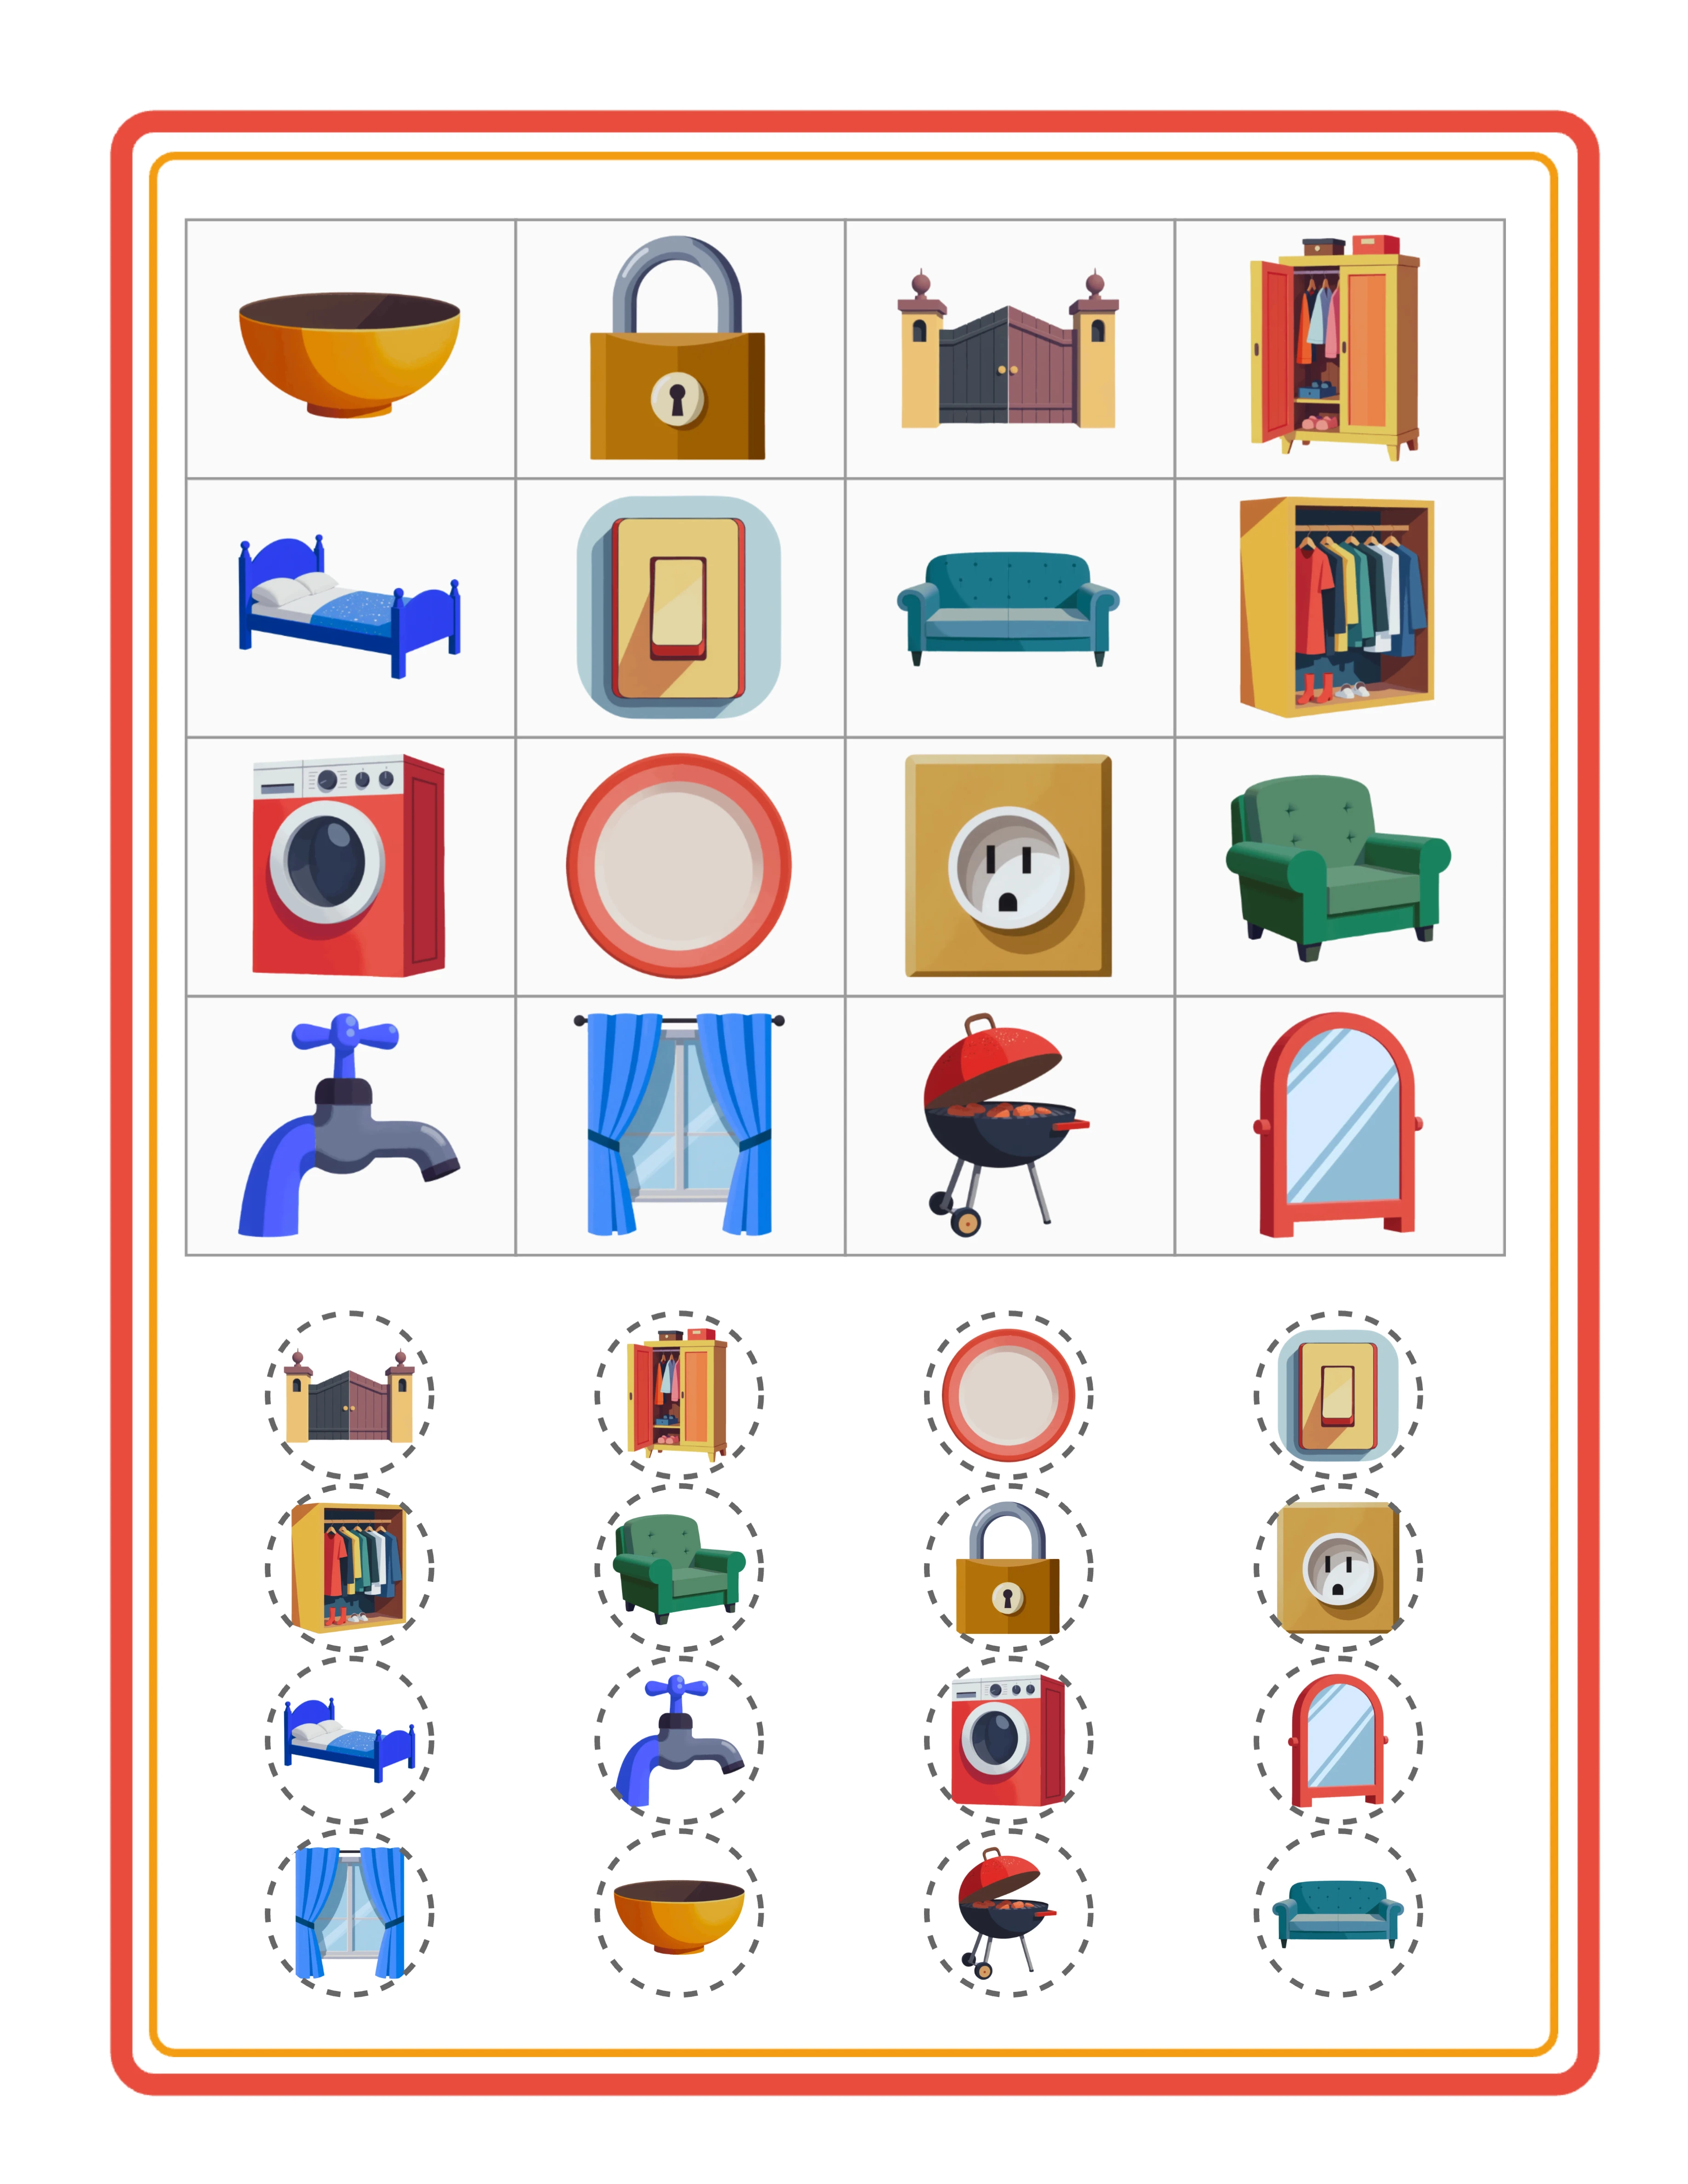
To select a theme, use the Select Theme dropdown or the search field in the image library section. Once selected, the generator uses images from that theme for all matching pairs. A "farm animals" theme produces pairs with cows, pigs, chickens, and horses. An "ocean" theme shows fish, whales, dolphins, and starfish.
Theme selection is a strategic product decision. Each theme creates a distinct product with its own search keywords. Ten themes at one difficulty level gives you ten unique listings from the same generator session. Seasonal themes (Halloween, Christmas, Valentine's Day) let you create products that spike in demand at predictable times.
You can also upload your own images (PNG, JPG, GIF) alongside library content. This is useful for creating branded worksheets or products using custom illustrations that differentiate your listings from competitors.
For matching worksheets specifically, choose themes where items are visually distinct from each other. Animals work better than abstract shapes because children can clearly distinguish a cat from a dog. Food items, vehicles, and occupations are also strong choices because each item is immediately recognizable.
3
Set the Number of Pairs and Layout Options
The number of pairs per worksheet directly controls difficulty and serves as a simple product differentiation tool.
The generator offers three pair count options: 4, 5, or 6 pairs per worksheet.
4 pairs: Best for preschool (ages 3–4). Fewer items to match means less cognitive load. Large images with plenty of whitespace. These are your entry-level products.
5 pairs: The sweet spot for pre-K and kindergarten (ages 4–6). Enough challenge to be engaging without overwhelming the younger audience. This is the most versatile setting for general-purpose matching worksheets.
6 pairs: Best for kindergarten and first grade (ages 5–7). More pairs require greater visual scanning and concentration. Position these as more advanced matching practice.
Set the pair count using the Number of Pairs selector in the configuration panel.
Additional layout options include:
Name and Date Fields: Adds name and date lines at the top. Buyers strongly prefer worksheets with these fields — always enable them for group-targeted products.
Item Numbers: Numbers each pair (1, 2, 3...) on both columns. This helps with grading and reference. Enabled by default.
Show Bullets/Dots: Displays alignment dots next to each item in both columns. These dots guide children on where to start and end their connecting lines. Enabled by default and recommended for all preschool products.
Page Size options include US Letter Portrait, US Letter Landscape, A4 Portrait, A4 Landscape, Square, and Custom dimensions. US Letter is standard for North American buyers. A4 is standard for European and international markets. Creating both versions doubles your market reach.
4
Configure Per-Row Display Options
Image-or-Name mode and Custom mode unlock a per-row configuration panel that gives you individual control over every row in the worksheet. This is the most powerful feature for creating varied, assessment-style matching worksheets.
In Image-or-Name mode, each row has a dropdown that lets you choose what appears on each side: Image Only, Name Only, or Image + Name. You can create a worksheet where row 1 shows image-to-image (easy), row 2 shows image-to-name (medium), and row 3 shows name-to-name (hard). This mixed difficulty within a single worksheet is valuable for sellers doing informal assessments.
In Custom mode, each row has a text input field where you type the word or phrase that should appear opposite the themed image. This enables:
Spelling practice: Type the correct spelling of each image's name. Children match images to words, reinforcing spelling.
Foreign language vocabulary: Type translations. A French vocabulary worksheet shows English images matched to French words.
Sight word drills: Type sight words and match them to relevant images.
Category sorting: Type category labels like "Farm" or "Ocean" and match them to animals from those categories.
The per-row configuration panel appears below the main settings when you select Image-or-Name or Custom mode. Each row shows a preview of the current image and its configurable options. Adjust individual rows to create the exact worksheet structure you want.
This per-row flexibility is a significant product differentiator. Most competing matching worksheet generators only offer uniform formats — every row looks the same. The ability to vary difficulty and content within a single worksheet creates products that stand out in crowded marketplace categories.
5
Customize with Text, Background, and Border Themes
Visual polish separates worksheets that sell from worksheets that sit unsold in a shop. The Matching Worksheet Maker includes a full suite of customization tools.
The localized "Match Up!" header appears automatically at the top of every worksheet in a colorful pill-shaped badge. The text is localized for all 11 supported languages — German worksheets show "Ordne zu!", French shows "Associe !", Spanish shows "Empareja!". This header gives worksheets a polished, branded appearance without manual text placement.
Text Tools let you add custom titles, instructions, or branding anywhere on the canvas. Select from 7 font families (Lexend Deca, Baloo 2, Nunito, Quicksand, Fredoka, Arial, Verdana), adjust size and color, add outline effects, and position text by dragging on the canvas. Add instructions like "Draw a line to match each picture to its beginning letter" for group-ready worksheets.
Background Themes apply subtle decorative backgrounds with adjustable opacity. A light patterned background makes worksheets feel more designed without reducing readability. Keep opacity low (10–20%) for printed worksheets.
Border Themes add decorative frames around the worksheet. Themed borders (stars, hearts, paw prints) complement the image theme and make worksheets look professionally designed. Adjust border opacity to balance decoration with content visibility.
The canvas supports full Fabric.js editing: drag to reposition, resize handles to scale, rotation for angled text, layer ordering for overlapping elements, lock/unlock to prevent accidental changes, and alignment tools to snap elements into position. Zoom from 25% to 300% for detail work.
6
Generate and Preview Your Worksheet
With your settings configured, click the Generate button to create your matching worksheet. The generator arranges themed images and their matching pairs into two shuffled columns on the canvas.
The preview appears on the Worksheet tab. Examine it carefully before exporting:
Check column alignment: Are both columns evenly spaced? Do items align horizontally with their corresponding bullets/dots? Is there enough space between rows for children to draw lines without crowding?
Check image clarity: Are images large enough to be recognizable at print size? Do any images look too similar to each other (which would confuse young children trying to distinguish pairs)?
Check pair randomization: The generator shuffles the right column so pairs are not in matching order. Verify that the shuffling creates a reasonable crossing pattern — lines should cross for a genuine matching challenge.
Check text readability: If using Image+Name or Custom mode, verify that word labels are legible at the intended print size. Increase font size if text appears too small.
If anything looks off, adjust your settings and regenerate. The canvas updates quickly, allowing rapid iteration. Try different pair counts to find the layout density that looks best for your target age group.
Use undo/redo (up to 20 states) to step back through changes if you prefer a previous version. The grayscale toggle lets you preview how the worksheet will look in black and white for ink-saving prints.
7
Review the Automatic Answer Key
Every matching worksheet generated includes an automatic answer key. Click the Answer Key tab next to the Worksheet tab to view it.
The answer key shows the same two-column layout as the worksheet, but with horizontal connecting lines drawn between each correct pair. This visual format makes grading instant — a buyer or parent simply compares the child's drawn lines against the answer key lines.
This is different from text-based answer keys in other generators. Because matching worksheets are visual by nature, the answer key is also visual. Lines connect left-column items to their correct right-column matches, showing the exact pattern children should draw.
The answer key is essential for marketplace sales for two reasons:
Buyers need it for efficient grading. A matching worksheet without an answer key forces buyers to figure out the correct pairs themselves — time-consuming and frustrating when grading stacks of papers.
Parents need it for verification. Homeschool parents especially value answer keys because they may not immediately know which image matches which letter or word, particularly for Image+Name mode with themed vocabulary.
When listing products on marketplaces, always mention the answer key prominently. "Includes answer key with connecting lines" is a selling point that differentiates your product from competitors who offer worksheets without answer keys. On Etsy and Gumroad, "with answer key" is a commonly searched qualifier that improves listing visibility.
8
Export as Print-Ready PDF and JPEG
The export section provides four download buttons — two for the worksheet and two for the answer key.
Worksheet JPEG: A high-resolution 300 DPI image. Use for listing preview thumbnails, social media marketing, or as part of a digital download bundle.
Worksheet PDF: The professional standard for printable products. PDF files maintain exact formatting across all devices and printers. This is the format marketplace buyers expect.
Answer Key JPEG: A separate high-resolution image of the answer key. Include in your listing preview images to show buyers what is included.
Answer Key PDF: A separate PDF of the answer key. Include alongside the worksheet PDF in your product download.
For marketplace listings, export both the PDF (as your deliverable product) and a JPEG (for listing preview images). Buyers want to see exactly what they are purchasing.
The grayscale toggle converts the entire worksheet to black and white before export. This is useful for products marketed as "ink-saving" or "printer-friendly" — a real selling point for group buyers who print in bulk.
Important: the free trial with watermark produces fully functional exports with a visible watermark overlay. This lets you evaluate print quality, verify layout formatting, and create test prints before purchasing a commercial license. The commercial license removes the watermark, producing clean files ready for sale.
.webp)
.webp)


.webp)